
Checkerboard Cookies
These Checkerboard Cookies are buttery, crisp and perfectly balanced between vanilla and chocolate. Made with two simple doughs, they bake into neat squares that look as impressive as they taste - a little vintage, a little fancy but easy enough for any home baker during the holiday season.

My grandmother used to bake these cookies all the time, and luckily, my aunt still makes them today. Each bite melts with that classic buttery sweetness, followed by a rich hint of cocoa and espresso that gives them depth. Perfect for filling a holiday cookie tray or your next little baking project, these checkerboard cookies bring both flavor and fun to your kitchen.
Making a batch of these nostalgic, festive cookies always gets us in the holiday spirit. For more ideas to add to your Christmas dessert spread or cookie exchange, try our Peppermint Cookies and Chewy Ginger Molasses Cookies.
Jump to:
Why You Will Love This Recipe
- Visually Stunning: These cookies look like they came straight from a bakery, yet they're simple to make at home.
- Classic Flavor Combo: Vanilla and chocolate are timeless together, and the espresso adds a little grown-up twist.
- Perfect Texture: Crisp on the edges with a soft, buttery bite in the middle.
- Freezer-Friendly: You can chill or freeze the dough ahead of time for easy holiday prep.
- Fun to Make: The process of assembling the checkerboard pattern is just as rewarding as the final result.
Ingredients
Made with simple pantry staples, these cookies combine a buttery vanilla dough and a rich chocolate-espresso dough to create their signature checkerboard pattern.

See the recipe card below for the exact quantities of each ingredient.
- Unsalted Butter: Softened for a rich, buttery base.
- Granulated Sugar: Sweetens and adds a delicate crispness.
- Large Egg: Binds everything together for a cohesive dough.
- Cocoa Powder (Unsweetened): Deepens the flavor and color of the chocolate dough.
- Ground Espresso: Enhances the chocolate flavor and adds a subtle coffee note.
Get out your stand mixer and paddle attachment, mixing bowl, measuring cups and spoons, plastic wrap and a baking tray for this cookie recipe.
Variations
- Espresso-Free: Skip the espresso if you prefer a more traditional chocolate-vanilla flavor.
- Matcha Checkerboard Cookies: Try matcha in place of cocoa for a green-and-cream checkerboard.
- Flavored Extract: Almond or peppermint extract gives a festive spin.
- Dairy-Free: Use a dairy-free butter alternative for a plant-based version.
- Sugar Dusted: Sprinkle granulated sugar before baking for extra sparkle.
How to Make Checkerboard Cookies
This recipe is all about a little patience and precision, but with a few easy steps, you'll have picture-perfect squares of vanilla and chocolate ready to bake.

In a medium bowl whisk together all-purpose flour, baking powder and sea salt, then set aside.
Using a stand mixer cream together softened butter and sugar for about 3 minutes, scraping down the sides of the bowl as needed, on medium low speed.
Add in the egg and vanilla and beat for about 30 seconds.
Slowly add in flour mixture just until combined.
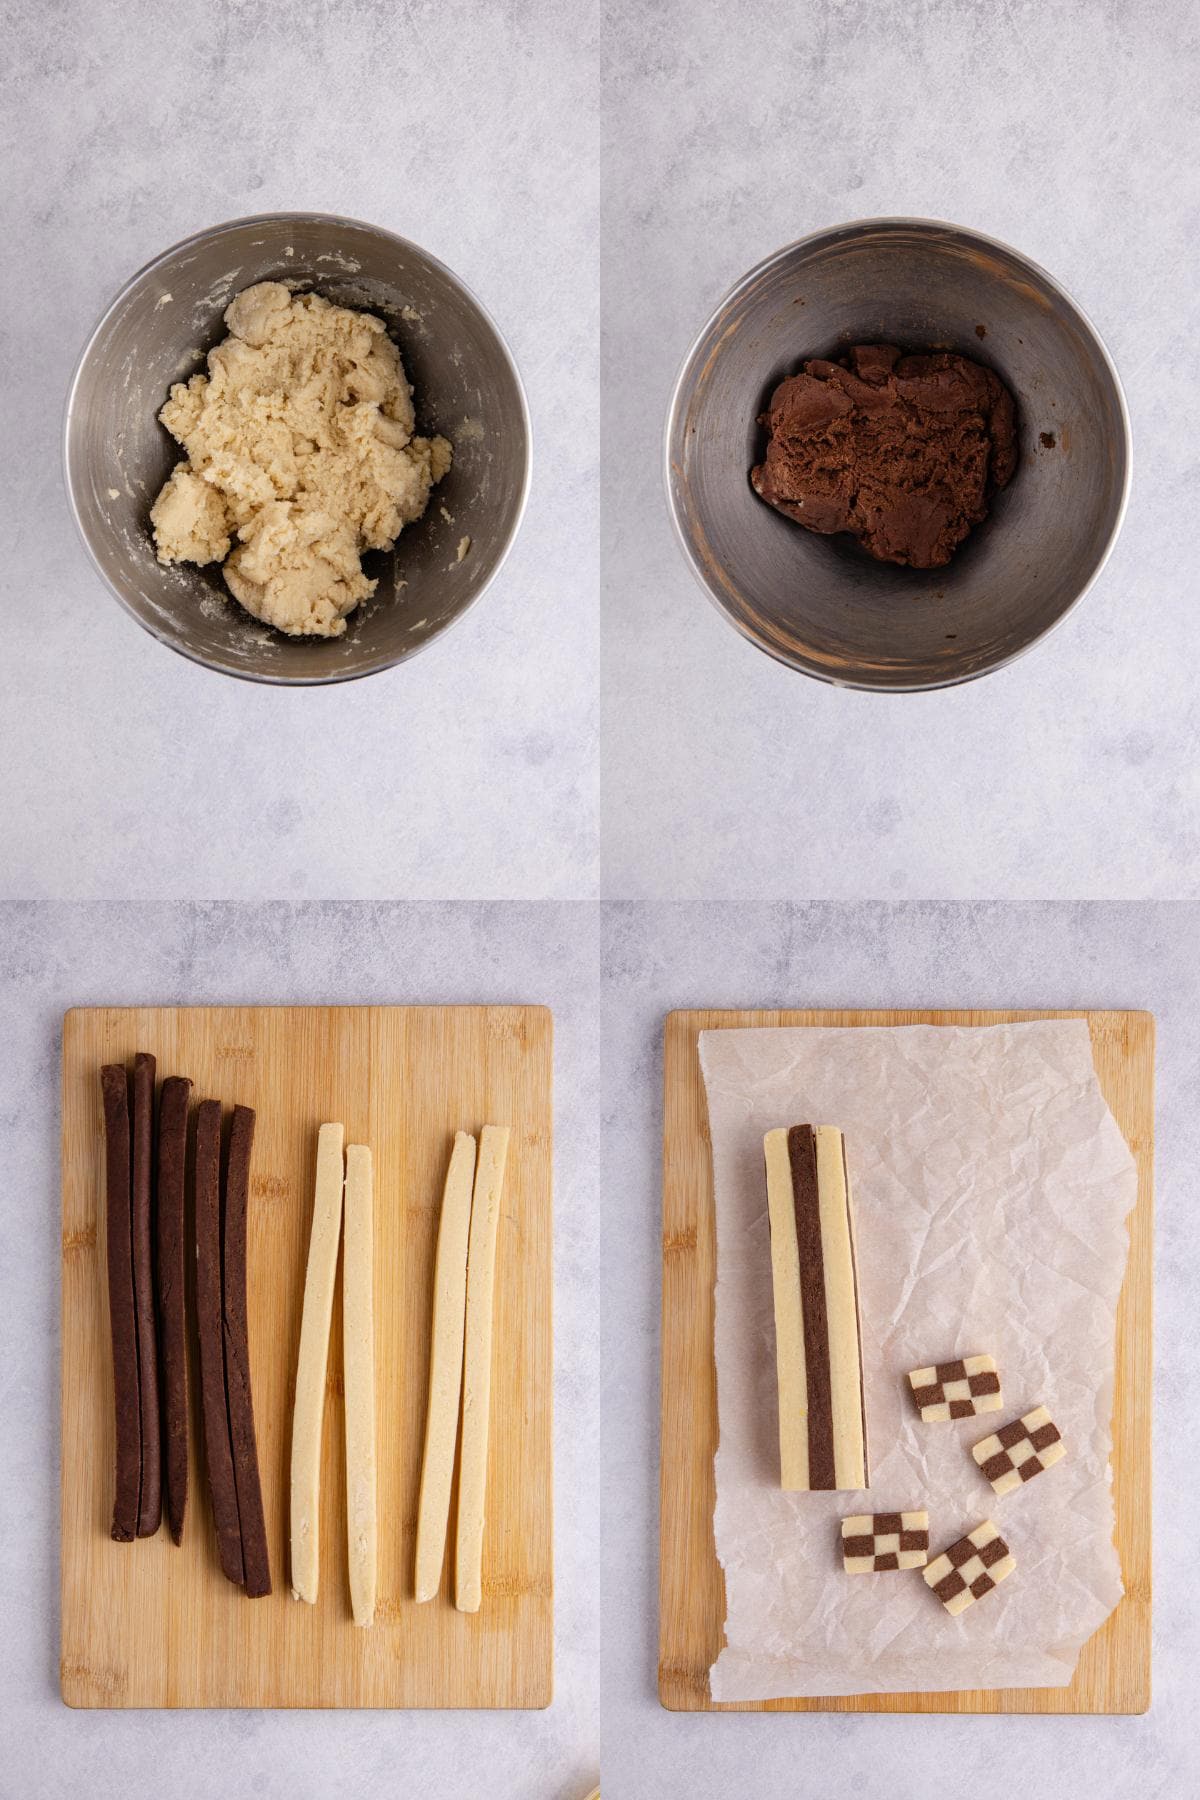
Divide the dough in half, leaving one ball in the mixer bowl, then add cocoa powder and ground espresso and mix until fully incorporated (note: if there is any on the bottom of the mixer that is not blending add ½ teaspoon of milk or water and run again).
Shape each dough ball into a log on top of plastic wrap then wrap loosely.
Gently roll it back and forth until it is about 12 inches long, then flatten all 4 sides with a flat surface like a baking sheet to create a long rectangle (note: I like to do both at the same time, so they are the same sizes).
Tighten the plastic wrap and chill for at least 30 minutes.
Working with 1 at a time, slice each square log into three equal strips of dough, then lay each strip flat and cut into three more each, making nine total.
Repeat for the other color, then alternate dough strips to create a checkered pattern (vanilla, chocolate, vanilla) using a pastry brush, lightly coat joining edges with the egg wash and carefully press the 3 together.
Repeat once more with the same pattern, then alternate chocolate, vanilla chocolate.
Once you have those 3 done, brush them with the egg wash and stack them on top to create a square.
Repeat for the other 9 strips. Cover in plastic wrap and chill again for at least another 30 minutes.
Preheat oven to 350F degrees and line a cookie sheet with parchment paper.
Remove the dough from the fridge and cut ½ inch wide cookies with an inch or so space between; they will puff a little, but they will not spread too much.
Bake cookies for about 8 minutes, the edges should just start to be turn gold. Allow them to cool for 10 minutes on the cookie sheet and then transfer to a wire rack.
Hint: Keep it cool, cold dough is easier to slice and holds its shape while baking.

Recipe Tips
- Even Strips: Use a ruler or bench scraper for straight, clean cuts.
- Don't Overmix: Once the flour is added, mix only until just combined.
- For Sharp Edges: Trim the ends of the dough logs before slicing for a tidy look.
- Chill Between Steps: A short chill between assembling and slicing keeps the pattern crisp.
If you are a coffee lover who enjoys desserts with a hint of espresso, you will want to try our Espresso Chocolate Chip Cookies too.
More Dessert Recipes You Will Love


Storage Instructions
- Countertop: These buttery cookies store on the counter for up to 5 days out of direct sunlight.
- Fridge: Store cooled cookies in an airtight container for up to 5 days.
- Freezer: Freeze unbaked checkerboard logs wrapped in plastic and foil for up to 3 months.
Serving Suggestions

Checkerboard Cookies Recipe FAQs
Yes! You can prepare and chill the dough up to two days in advance or freeze it for longer storage.
Not necessarily, but it enhances the chocolate flavor and makes it richer.
The dough may have been too soft, chilling it before baking helps maintain clean lines.

More Recipes You Will Love
Here are some more recipes you'll want to try!

Ready to get cooking? Save time by having a grocery list automatically generate for you by clicking the "Add to Shopping List" below.

Checkerboard Cookies
Equipment
- Measuring Cups and Spoons
- Mixing Bowl
- Stand Mixer with Paddle Attachment
- Cookie Sheet
- Plastic Wrap
Ingredients
- 375 grams all-purpose flour about 3 cups
- 2 teaspoon baking powder
- ½ teaspoon sea salt
- 2 stick butter unsalted and softened
- 200 grams granulated sugar about 1 cup
- 1 tablespoon vanilla extract
- 1 large egg
- ¼ cup cocoa powder
- 2 teaspoon ground espresso
EGG WASH:
- 1 egg
- 1 tablespoon water
Instructions
- In a medium bowl whisk together all-purpose flour, baking powder and sea salt, then set aside.
- Using a stand mixer cream together softened butter and sugar for about 3 minutes, scraping down the sides of the bowl as needed, on medium low speed.
- Add in the egg and vanilla and beat for about 30 seconds.
- Slowly add in flour mixture just until combined.
- Divide the dough in half, leaving one ball in the mixer bowl, then add cocoa powder and ground espresso and mix until fully incorporated (note: if there is any on the bottom of the mixer that is not blending add ½ teaspoon of milk or water and run again).
- Shape each dough ball into a log on top of plastic wrap then wrap loosely.
- Gently roll it back and forth until it is about 12 inches long, then flatten all 4 sides with a flat surface like a baking sheet to create a long rectangle (note: I like to do both at the same time, so they are the same sizes).
- Tighten the plastic wrap and chill for at least 30 minutes.
- Working with 1 at a time, slice each square log into three equal strips of dough, then lay each strip flat and cut into three more each, making nine total.
- Repeat for the other color, then alternate dough strips to create a checkered pattern (vanilla, chocolate, vanilla) using a pastry brush, lightly coat joining edges with the egg wash and carefully press the 3 together.
- Repeat once more with the same pattern, then alternate chocolate, vanilla chocolate.
- Once you have those 3 done, brush them with the egg wash and stack them on top to create a square.
- Repeat for the other 9 strips. Cover in plastic wrap and chill again for at least another 30 minutes.
- Preheat oven to 350F degrees and line a cookie sheet with parchment paper.
- Remove the dough from the fridge and cut ½ inch wide cookies with an inch or so space between; they will puff a little, but they will not spread too much.
- Bake cookies for about 8 minutes, the edges should just start to be turn gold. Allow them to cool for 10 minutes on the cookie sheet and then transfer to a wire rack.
Notes
- Keep it Cool: Cold dough is easier to slice and holds its shape while baking.
- Even Strips: Use a ruler or bench scraper for straight, clean cuts.
- Don't Overmix: Once the flour is added, mix only until just combined.
- For Sharp Edges: Trim the ends of the dough logs before slicing for a tidy look.
- Chill Between Steps: A short chill between assembling and slicing keeps the pattern crisp.
Nutrition
We would be so grateful for you to leave us a rating and review on any recipes you try. If you make any alterations, let us know how they turned out.


They look so impressive and vintage, what a lovely holiday bake!
I hope you enjoy them as much as we do.
How perfect these cookies are! Definately keeping your tips in mind before making them!
They are a good one! My grandmother made them all the time- they look intimidating but are much simpler than you think. Enjoy and happy baking.
These are such a nostalgic cookie, we love the hint of coffee flavor mixed with the vanilla!