
Layered Cheesecake
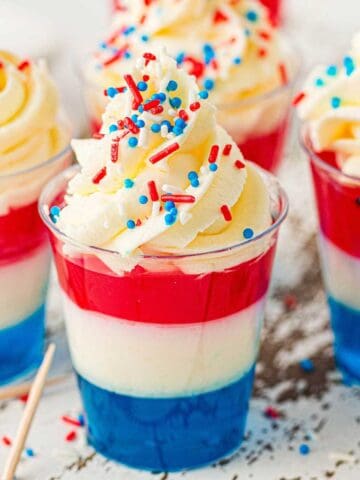
This Layered Cheesecake is a festive, eye-catching dessert that delivers classic creamy textures with vibrant red, white and blue layers. Made with rich cream cheese, this decadent dessert is smooth, luscious and perfect for special occasions like the Fourth of July, Memorial Day or a celebratory potluck.

This is one of those cheesecakes you'll want to make year after year, it's reliable, adaptable and stunning on the top of the cake plate.
Celebrating with sweets? A couple of our favorite patriotic desserts are our Red, White and Blue Dump Cake, and Red, White and Blue Fruit Cups. And to pair with your desserts with our Bomb Pop Cocktail.
Jump to:
Ingredients
All you need is a quick trip to the grocery store to make this creamy cheesecake.

See the recipe card below for the exact quantities of each ingredient.
- Cream Cheese, Full Fat: I prefer full fat for a smoother cheesecake. It also can attribute to a denser texture.
- Granulated White Sugar: Sugar adds a sweetness to balance the tangy cream cheese. You can also add a little to sweeten the crust if desired.
- Cornstarch: Similarly to eggs, it acts as a stabilizer by thicken the batter and holding the ingredients together.
- Whipping Cream: Adds to the creamy texture and adds a light airy texture.
- Eggs: Help to thicken and stabilize the batter.
- Red and Blue Food Coloring: I used a mix of gel and liquid food coloring, but you can use whatever you are most comfortable with.
For this dessert recipe, you'll want to grab your 9" springform pan, mixing bowls, hand mixer, measuring cups and spoons, tinfoil, roasting pan and a wire cooling rack.
Variations
- Crust Mixture: Use Oreo crumbs, chocolate cookie crust or classic graham cracker crumbs for different base batter.
- Dairy: Swap heavy cream for sour cream in the filling for added tang.
- Sugar: Use brown sugar or superfine sugar in place of white for deeper flavor or smoother texture.
- Flavored Variations: Add lemon zest, vanilla extract, cocoa powder for a chocolate layer or swirl in jam for a cherry cheesecake dessert twist.
How to Make a Layered Cheesecake
Check out these step-by-step photos to show you how to make this 3 layered cheesecake.

Preheat oven to 325F. Mix the graham crackers crumbs and butter in a small mixing bowl. Press the mixture into the bottom of the springform pan. Bake for 10 minutes, then set aside to cool.
Reduce the oven temperature to 300F.
In a large bowl, beat the cream cheese and sugar, until smooth with a hand mixer. Drop in the cornstarch and mix until well blended on low speed.
Pour in the whipping cream and continue mixing on low speed until well combined.
Add eggs one at time, beating slowly just until incorporated. Scrape the sides of the bowl and beat until smooth.
Divide the cheesecake batter into 3 equally sized potions. Stir in blue food coloring into one until you have reached your desired color (note: many food colorings darken with time). Repeat for the red and leave the 3rd bowl white.
Wrap the springform pan in tinfoil to place into a water bath later.
CHEESECAKE LAYERS:

Pour the blue cheesecake batter on the center crust and spread flat but leave about an inch or so from the edge.
Carefully pour the white starting from the center and spread the same way. The blue layer should start to spread naturally with the weight of each layer.
Repeat again for the red layer.
Place the springform pan in a roasting pan and fill it up halfway with water and place in the oven. Bake for 1 hour and 40 minutes. Shut the heat off and open the oven door just a bit and leave in for an additional 30 minutes.
After the 30 minutes of rest, remove the cheesecake from the oven and let sit for 2 hours. Place in the fridge for 2 hours or overnight to fully set.
Garnish the top layer with whipped cream and sprinkles if desired.
Hint: Make sure your cream cheese, eggs and whipping cream are room temperature for the smoothest cheesecake batter.

Recipe Tips
- Don't Overmix: Use an electric mixer or stand mixer with the paddle attachment on low speed to keep the batter dense and creamy.
- Pour Layers Carefully: Use the back of a spoon or pour from the center, slowly circling outward for even layers without color blending.
- Water Bath Setup: Double wrap the bottom and sides of the pan with foil. Doubling up helps to ensure the springform pan doesn't take in water; believe me, I have done it, and while the crust was a little soft, it was still delicious!
- Cool Gradually: After baking, let it cool in the oven with the door cracked, then transfer to a wire rack before chilling in an airtight container or wrapping with plastic wrap.
One of my simplest, festive recipes to make is this Red, White and Blue Candy.
More Desserts


Storage Instructions
- Refrigerator: Once cooled, place in an airtight container for 3-4 days. If it is still in the springform pan, cover tightly in plastic wrap then store. I like to keep it on a cutting board with parchment paper or small baking tray.
- Freezer: I prefer to cut individual slices and cover them tightly in plastic wrap, and foil to prevent freezer burn and they can last up to 3 months. This is a great way to grab a piece at a time! Allow the cheesecake to come to room temperature overnight in the fridge and enjoy.
Serving Suggestions
- Red, White and Blue Desserts: Create a whole show-stopping dessert table with festive dessert option like our Patriotic Poke Cupcakes, Red, White and Blue Poke Cake, Red, White and Blue Trifle and Red, White and Blue Cookies.
- Our Most Popular Cheesecake Recipes: Cherry Cheesecake Pie, Baileys Cheesecake and Eggnog Cheesecake.

Red, White and Blue Cheesecake FAQs
You totally can, but a water bath ensures even baking and prevents cracks.
Yes, it makes releasing the cheesecake easy and ensures straight sides of the cake.
Use a sharp knife or thin knife dipped in hot water and wiped clean between each cut.

More Recipes


Ready to get cooking? Save time by having a grocery list automatically generate for you by clicking the "Add to Shopping List" below.

Layered Cheesecake
Equipment
- 9" Springform Pan
- Mixing Bowls
- Measuring Cups and Spoons
- Hand Mixer
- Tinfoil
- Roasting Pan
- Wire Cooling Rack
Ingredients
CRUST:
- 300 grams graham crackers crumbs about 2 ½ cups
- 1 stick butter unsalted and melted
CHEESECAKE FILLING:
- 750 grams cream cheese 3 bricks, softened
- 200 grams white granulated sugar about 1 cup
- 1 ½ tablespoon cornstarch
- 1 cup whipping cream
- 3 large eggs room temperature
- blue and red food coloring
Instructions
- Preheat oven to 325F. Mix the graham crackers crumbs and butter in a small mixing bowl. Press the mixture into the bottom of the springform pan. Bake for 10 minutes, then set aside to cool.
- Reduce the oven temperature to 300F.
- In a large bowl, add the cream cheese and sugar, beat until smooth with a hand mixer. Add the cornstarch and mix until well blended on low speed.
- Add the whipping cream and continue mixing on low speed until well combined.
- Add eggs one at time, beating slowly just until incorporated. Scrape the sides of the bowl and beat until smooth.
- Divide the cheesecake batter into 3 equally sized potions. Stir in blue food coloring into one until you have reached your desired color (note: many food colorings darken with time and baking). Repeat for the red and leave the 3rd bowl white.
- Wrap the springform pan in tinfoil to place into a water bath later.
- Pour the blue cheesecake batter on the center crust and spread flat but leave about an inch or so from the edge.
- Carefully pour the white starting from the center and spread the same way. The blue layer should start to spread naturally with the weight of each layer.
- Repeat again for the red layer.
- Place the springform pan in a roasting pan and fill it up halfway with water and place in the oven. Bake for 1 hour and 40 minutes. Shut the heat off and open the oven door just a bit and leave in for an additional 30 minutes.
- After the 30 minutes of rest, remove the cheesecake from the oven and let sit for 2 hours. Place in the fridge for 2 hours or overnight to fully set.
- Garnish the top layer with whipped cream and sprinkles if desired.
Notes
- Don't Overmix: Use an electric mixer or stand mixer with the paddle attachment on low speed to keep the batter dense and creamy.
- Pour Layers Carefully: Use the back of a spoon or pour from the center, slowly circling outward for even layers without color blending.
- Water Bath Setup: Double wrap the bottom and sides of the pan with foil. Doubling up helps to ensure the springform pan doesn't take in water; believe me, I have done it, and while the crust was a little soft, it was still delicious!
- Cool Gradually: After baking, let it cool in the oven with the door cracked, then transfer to a wire rack before chilling in an airtight container or wrapping with plastic wrap.
- Smoothest Batter: Make sure your cream cheese, eggs and whipping cream are all room temperature.
- Refrigerator: Once cooled, place in an airtight container for 3-4 days. If it is still in the springform pan, cover tightly in plastic wrap then store. I like to keep it on a cutting board with parchment paper or small baking tray.
- Freezer: I prefer to cut individual slices and cover them tightly in plastic wrap, and foil to prevent freezer burn and they can last up to 3 months. This is a great way to grab a piece at a time! Allow the cheesecake to come to room temperature overnight in the fridge and enjoy.
Nutrition
We would be so grateful for you to leave us a rating and review on any recipes you try. If you make any adjustments, let us know how they turned out.

Love how fun and festive this was, and can be done with any colors! Yummy too, of course.