
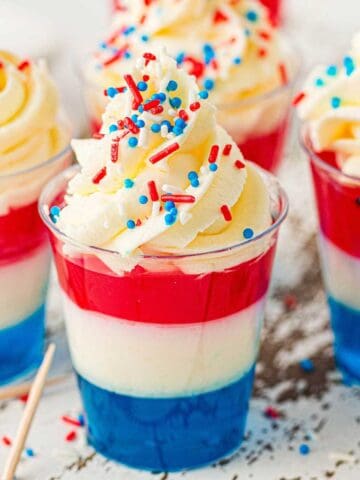
Red, White, and Blue Candy
This Red, White, and Blue Candy is a fun, no-bake treat layered with chocolate, crunchy cookies, and festive candy. It's quick to make, easy to customize, and perfect for summer parties, holiday trays, or sharing with a crowd.

Whether you're serving it in patriotic packaging, giving it away as party favors, or breaking it into chunks for your next event, this is the type of dessert that always gets people talking. Red, white and blue bark makes for affordable fun treats packed with sweet, chocolatey nostalgia-like something you'd find in a retro candy store or a patriotic mystery bag.
We can't resist a great patriotic dessert. Two of our all time favorites are our Red, White and Blue Dump Cake and these Red, White and Blue Cookies.
Jump to:
⭐️⭐️⭐️⭐️⭐️ Reader Review
"I saw the patriotic M&Ms at the store and was looking for an easy, fun recipe to try with them. This was perfect, so easy! My kids inhaled it, thanks for the great recipe! We will definitely make it again this summer!"
-Risa
Ingredients
With just a quick trip to the grocery store, you will be ready to make this simple recipe.

See the recipe card below for the exact quantities of each ingredient.
- Semi-Sweet Chocolate: I used a mix of semi-sweet and milk chocolate for this recipe, but you can do whatever works best.
- White Chocolate: Whether you have a baking chocolate bar or white chocolate chips
- M&M's: The red, white and blue ones were perfect for a patriotic holiday cookie, but you can use whatever your favorite red, white or blue candies are.
- Oreos: We love the crunch added by the Oreos.
- Sprinkles: To fill in smaller areas.
For this easy recipe, you'll want to have on hand a 10x15" baking sheet, parchment paper, microwave safe bowls, medium saucepan, spatula, offset spatula and a cutting board.
Variations
- Change Up the Chocolate: Skip the semi-sweet and use all milk chocolate for a milder, more kid-friendly flavor; or try all dark chocolate and balance the other goodies.
- Try a Swirl Effect: Pour melted white chocolate in ribbons over the dark layer and swirl with a toothpick before chilling.
- Make it Spooky: Make a Halloween version and add orange and black sprinkles, candy corns and googly eyeballs.
- Valentines Version: Make a version for Valentine's giveaway and use your favorite pink candy, like rock candy, pink M&M's, or even pink pretzels for a salty/sweet combo.
- Get Nutty: Make a heartier version and use dark chocolate, a variety of nuts, and a sprinkle of flaky sea salt.
How to Make Red White and Blue Candy
Check out how quick and easy it was to make this easy recipe.

Line a 10x15 baking sheet with parchment paper and set aside.
Add chopped chocolate to a medium bowl and place over a saucepan with about 2 inches of water. Bring to a low boil stirring regularly once the chocolate starts to melt. When smooth, carefully transfer chocolate to parchment paper and spread evenly. Cool in the fridge for about 10 minutes.
Repeat for the white chocolate layer, but prior to putting in the fridge, sprinkle with M&M's, chopped Oreos and sprinkles as desired.
Chill in the fridge until set, about 30 minutes.
Chop or break apart and enjoy.
Hint: Melt your chocolate slowly to prevent seizing; I prefer to use a boil over low heat or a double boiler, but you can use a microwave if you prefer.

Recipe Tips
- Use Parchment Paper: This prevents sticking and makes cleanup a breeze.
- Chill Between Layers: Cooling the base layer keeps colors and textures clean and defined.
- Sprinkle While Wet: Add toppings right after spreading the white chocolate so they stick. Larger pieces can be lightly pressed into the chocolate layer, but the smaller ones should stick well on their own.
- Cutting Tips: Use a sharp knife to create even or strategic chunks or snap into rustic pieces by hand.
One of the simplest desserts you can really personalize, is our Red, White, and Blue Fruit Cups, great for small and large gatherings.
More No Bake Recipes
Storage Instructions
- Countertop: Once set, place in an airtight container for 1-2 weeks.
- Refrigerator: In an airtight container for 2-3 months.
- Freezer: Alternatively, you can place it in a freezer-safe container for up to 3 months.
- Make Ahead: If using bar chocolate, you can chop them up and place in individual containers, so they are ready to go!
Serving Suggestions
- Festive Desserts for a Crowd: Red, White and Blue Poke Cake, Poke Cupcakes, Patriotic Trifle, and our Cookie Cake.

Red, White, and Blue Bark Recipe FAQs
Yes! It stores beautifully in an airtight container in the fridge for several days.
Absolutely. Use a larger sheet pan or two 10x15 pans and split the layers evenly.
Choose quality white chocolate chips or bars that melt smoothly. Avoid candy melts if you want a creamy finish.
You can! Heat the chocolate in 20-second bursts, stirring between each until melted.
Arrange the pieces on a platter or break them into bags for party favors with a fun, patriotic holiday vibe.

More Recipes


Ready to get cooking? Save time by having a grocery list automatically generate for you by clicking the "Add to Shopping List" below.

Red White and Blue Candy
Equipment
- 10x15" Baking Sheet
- Parchment Paper
- Heat-Safe Bowl
- Medium Saucepan
- Offset Spatula
Ingredients
- 18 ounces semi-sweet chocolate (I used a mix of milk and semi-sweet)
- 12 ounces white chocolate
- ¼ cup M&M's or more
- 6 Oreos roughly chopped
- sprinkles
Instructions
- Line a 10x15 baking sheet with parchment paper and set aside.
- Add semi-sweet chocolate to a medium bowl and place over a saucepan with about 2 inches of water. Bring to a low boil stirring regularly once the chocolate starts to melt. When smooth, carefully transfer chocolate to parchment paper and spread evenly. Cool in the fridge for about 10 minutes.
- Repeat for the white chocolate layer, but prior to putting in the fridge, sprinkle with M&M's, chopped Oreos and sprinkles as desired.
- Chill in the fridge until set, about 30 minutes.
- Chop into individual pieces and enjoy.
Notes
- Melt your chocolate slowly to prevent seizing; I prefer to use a boil over low heat or a double boiler, but you can use a microwave if you prefer.
- Parchment paper prevents sticking and makes cleanup a breeze.
- Cooling the base layer keeps colors and textures clean and defined.
- Add toppings right after spreading the white chocolate so they stick. Larger pieces can be lightly pressed into the chocolate layer, but the smaller ones should stick well on their own.
- Use a sharp knife to create even or strategic chunks or snap into rustic pieces by hand.
Nutrition
We would be so grateful for you to leave us a rating and review on any recipes you try. If you make any alterations, let us know how they turned out.

Thanks for sharing with us, I'm featuring you when the next To Grandma's house we go link party starts!
Oh wow, thank you so much Tarahlynn! Looking forward to seeing it.
I saw the patriotic M&Ms at the store and was looking for an easy, fun recipe to try with them. This was perfect, so easy! My kids inhaled it, thanks for the great recipe! We will definitely make it again this summer!
Happy the kiddos enjoyed them. It really is a good one!
Made these to prep for our first July 4th living in the USA! They were so fun and easy. Thanks Eva!
So happy that you enjoyed it! Happy celebrating, and thanks for the review.
I made this candy a few days ago, but didn't go with the red white and blue theme. Everyone loved it, and you can add whatever color sprinkles decorations you like to match your theme - love it!
Thank you for the review, Leanne. I am so happy that you all enjoyed it.
We're having a huge 4th of July party, and I'm starting to gather ideas - I think this patriotic candy bark will be perfect on the dessert table. What I love, is that my kids can help make it, as it's easy to make.
That is so great to hear, it is fun when the kids can get involved. Enjoy it!
I made this red white and blue candy for a small get together and it turned out so fun and festive. Super easy to make and everyone loved it. Love the addition of oreo's here!
So happy to hear that it was a hit! Thanks for the review, Abi.
Made this for a lowkey weekend potluck and it was a hit! I used the peanut butter m&m's...SO GOOD!
Oh that sounds like a wonderful twist. I am going to have to try that! Thanks for the feedback!
This is so simple but so delicious! It is definitely gonna be a staple that I bring to any patriotic event we have this summer.
That is so great to hear. The best part is that you can put whatever you want in it! Enjoy!
This would be so perfect for our Fourth of July cookout! Making this for sure.
I hope you enjoy it!
This recipe is so simple to make. I make it with my kiddo often and he loves bring able to add whatever treats he likes!